How to draw an anchor
Table of Contents
Table of Contents
If you’re an aspiring artist looking to up your drawing skills, then you know the importance of having a diverse portfolio. And what better addition to your portfolio than a beautifully drawn anchor? Not only is it a staple in nautical designs, but anchors also have significant meaning in many cultures, making it a visually appealing subject. In this post, we’ll guide you on how to draw an anchor in simple steps, ensuring you achieve flawless results every time.
Challenges in drawing an anchor
Before we begin, let’s address some common issues that could arise while drawing an anchor. Anchors are complex structures, and capturing their intricate details can be challenging. Also, the curved shape of an anchor’s bottom requires a steady hand and a lot of patience.
How to draw an anchor
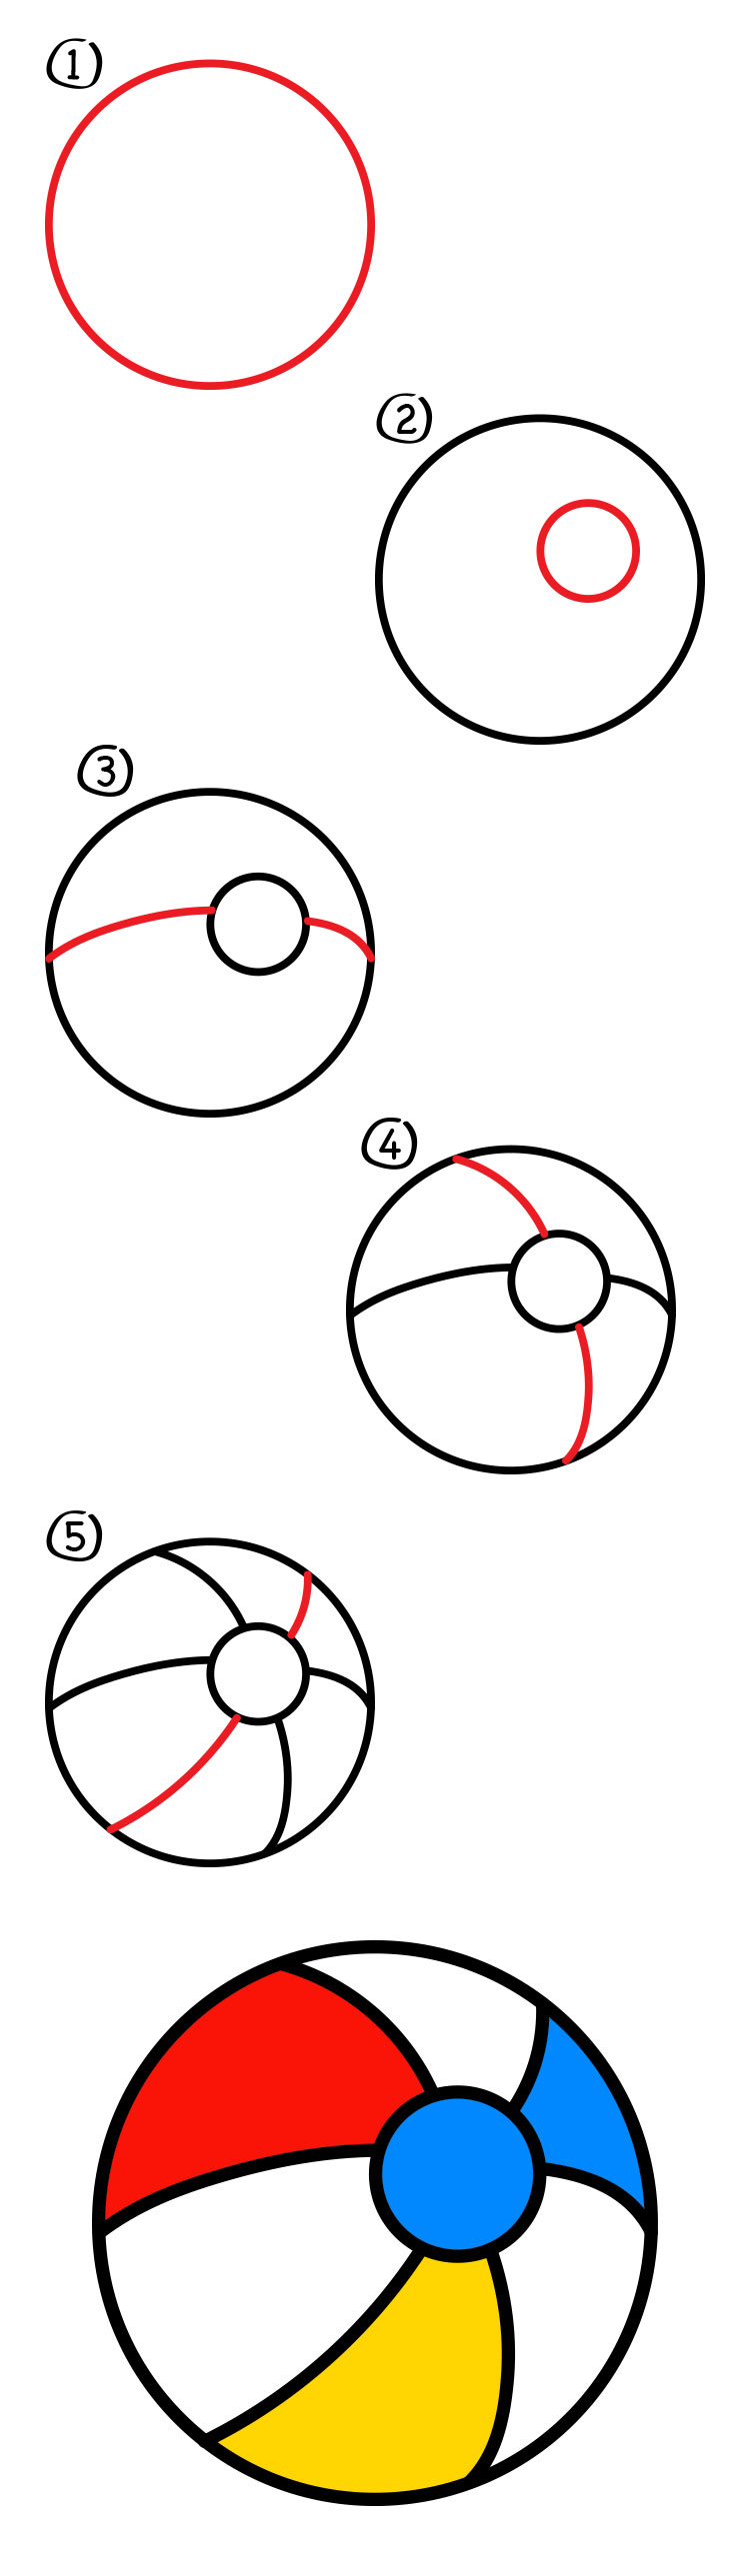
Start by drawing a straight vertical line, which will serve as the anchor’s shaft. Then, draw two curved lines on the bottom of the shaft, meeting at a point. Next, connect the curved lines using a straight horizontal line, creating the anchor’s flukes. Finally, add a curved line at the bottom, connecting the two flukes.
Summary
In summary, drawing an anchor requires a steady hand, attention to detail, and a lot of patience. It is essential to understand the structure and shape of an anchor before sketching it. Starting with simple shapes and slowly building up from there will help you achieve a flawless result. Don’t be afraid to make mistakes and keep practicing.
How to draw an anchor: Step-By-Step Guide
As a professional artist, I always found myself attracted to the beauty of anchor drawings. I remember the first time I drew an anchor, and how challenging it was to get the shape and curvature right. Over time, with practice and experimentation, I developed a step-by-step guide to achieving the perfect anchor drawing.
 The first step is to draw a vertical line creating the shaft of the anchor. This can be as long or as short as you want your anchor to be.
 Once you have the vertical line, draw two curved lines at the bottom that meet at the center point. These lines will make up the anchor’s flukes.
 Connect the two flukes with a straight horizontal line, creating the anchor’s shape. The curved part of the anchor’s bottom requires a steady hand and attention to detail.
 Finally, connect the anchor shaft and flukes with a curved line. Voila! You have yourself a beautiful anchor drawing.
Adding more dimensions to your anchor drawings
A great way to add more depth and detail to your anchor is to add shadows and highlights. With a soft lead pencil, shade in the areas of the anchor that are not directly facing the light source. This technique will give your anchor a more realistic and three-dimensional look.
Creating detailed anchor drawings
If you’re looking to take your anchor drawings to the next level, consider adding more intricate designs and details. These can include ropes wrapped around the anchor or a ship’s name engraved on the shaft. Remember to take it one step at a time and enjoy the process.
Exploring different styles of anchor drawings
There are different styles of anchor drawings, ranging from modern to vintage. Experiment with different styles and create a unique look that is true to your personal style. Adding colors and textures can also give a different dimension to your drawing, making it stand out.
Question and Answer
Q: What kind of paper is suitable for drawing an anchor?
A: Any good quality paper will work, but heavier papers or drawing paper will give better results.
Q: Can I use a pencil to color the anchor?
A: Yes, a pencil can be used to add color to the anchor. However, color pencils are recommended as they offer more vibrant colors and tones.
Q: How can I ensure the anchor is symmetrical?
A: Use a ruler to draw a vertical line through the center of the anchor; this will ensure the anchor is symmetrical. Also, take your time and don’t rush the process.
Q: Is it necessary to add shadows and highlights to the anchor drawing?
A: No, it is not necessary, but it can add more depth and detail to the drawing, making it more realistic.
Conclusion of How to Draw Anchor
Drawing an anchor requires a steady hand, attention to detail, and patience. With this guide, you can learn how to draw an anchor like a professional artist. Remember to practice and take it step-by-step. Don’t forget to experiment with different styles and designs to create unique and stunning anchor drawings. Have fun!
Gallery
Pin By Sherrie Howard On Морское | Anchor Drawings, Drawings, Drawing
Photo Credit by: bing.com / anchor drawing rope drawings draw choose board cool
Free Simple Anchor Cliparts, Download Free Simple Anchor Cliparts Png
Photo Credit by: bing.com / anchor drawing clipart cliparts simple library tattoo
How To Draw An Anchor Easy Step By Step Drawing Tutorial For Beginners
Photo Credit by: bing.com / drawing anchor step draw easy beginners tutorial
How To Draw An Anchor | Anchor Drawings, Anchor Decor, Anchor Stencil

Photo Credit by: bing.com / anchor draw coloring drawings outline pages stencil anclas drawing printable pattern anker anchors print vorlage template delta gamma tattoo crafts
How To Draw An Anchor Easy Step By Step Drawing Tutorial For Beginners
Photo Credit by: bing.com / step anchor draw easy drawing beginners tutorial tutorials steps visit below find if